Gas flow simulation through tubes with stardust particle engine
The Challenge: Simulate the flow through the tubes in a medical device. The device is a anesthesia workstation where three different gases are mixed. The device has two main working modes, manual ventilation and controlled ventilation. We had to find a solution to show the flow between the parts in different situations in a very understandable way. We designed a schematic version of the devices‘ tubes. And now it was my part to simulate the gas through the tubes.
Final result should look like this:
[jwplayer config=“640×360″ mediaid=“617″ image=“http://www.ketzler.de/wp-content/uploads/2020/08/flow-1stframe.jpg“]
The Options
I had tow options, first to fake it on the timeline or second, do it with a particle engine. I found two open source particle engines for Flash: flint and stardust.
I decided to use stardust because of the nice demo of the pixel renderer with the waypoints.
Experiments
I thought the 2D Waypoint are exactly what I need. But the tests showed that the particles moved much more randomly than it is good for a device used in clinical environment ;-).
Next I tried the stardust’s box border feature. But there was also to much random and the particle flow out of the system.
Finally I used the BitmapField with a VelocityField feature to block the particles inside the tubes.
Implementation
Here’s a little explanation how I did it.
As an example I show only this part of the tubes:
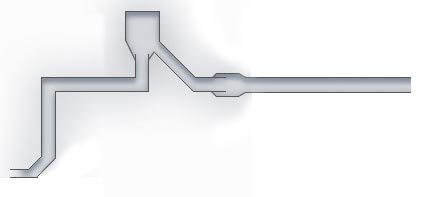
I painted a colormap like this:


Maybe it’s better to understand with little arrows showing the moving vector if a particle reaches a color area.

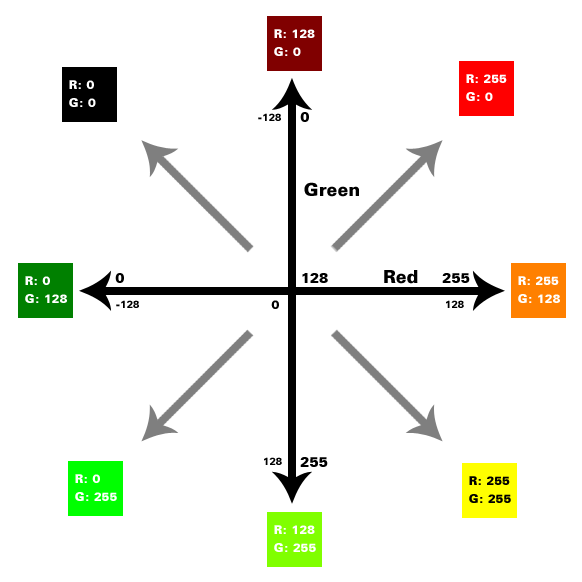
So how it works. Every time a particle moves over the color-map it analyses the color of the current position and moves that way. The motion vector is changed. This velocity vector is generated out of the Red and Green Channel of the Bitmap. RGB Colors have values between 0 and 255. But here values between minus and plus something are needed. The engine converts 0-255 to -128 to 128 values. In this graphic you can see the red and green values for all 45° vectors.
I have distributed some emitters and death zones over the tube system. So that a particle never moves through the whole system. A particel starts, moves to his next death zone and there a listener decides what to do with this died particle. e.g. let it start on a next emitter or let the bag or lung grow and so on.
Code
And here is some code:
Every particle needs the following:
protected var startZone:CircleZone = new CircleZone();
protected var deathZone:CircleZone = new CircleZone();
// The Color Map
protected var bmpField:BitmapField = new BitmapField();
// Bitmapdata of the Color Map
protected var bmp:BitmapData = new BitmapData(654,524);
// A mover
protected var myMove : Move = new Move();
private var tempIter : ParticleIterator;
The bitmapfield is massless:
And has a maximum moving of 4 pixels:
After you have filled the bitmap with data update the color map:
bmp.draw(new AssetFlowMapFreshGas());
bmpField.update(bmp);
The Emitter needs the following actions and initializers:
addAction(new DeathZone(deathZone));
// some moving
myMove.multiplier = 1;
addAction(myMove);
// AND HERE the velocity changed by the painted flow-map
var velField:VelocityField = new VelocityField();
velField.field = bmpField;
addAction(velField);
// a little bit random
var rf:RandomDrift = new RandomDrift(1, 1);
rf.massless = true;
rf.priority = -3; //lower than -2
addAction(rf);
// my own color initalizer because of the three different gas colors
addInitializer(new RandomColorInitializer());
The final simulation isn’t ready yet but it can be found later this year on the Dräger homepage under Fabius GS premium.